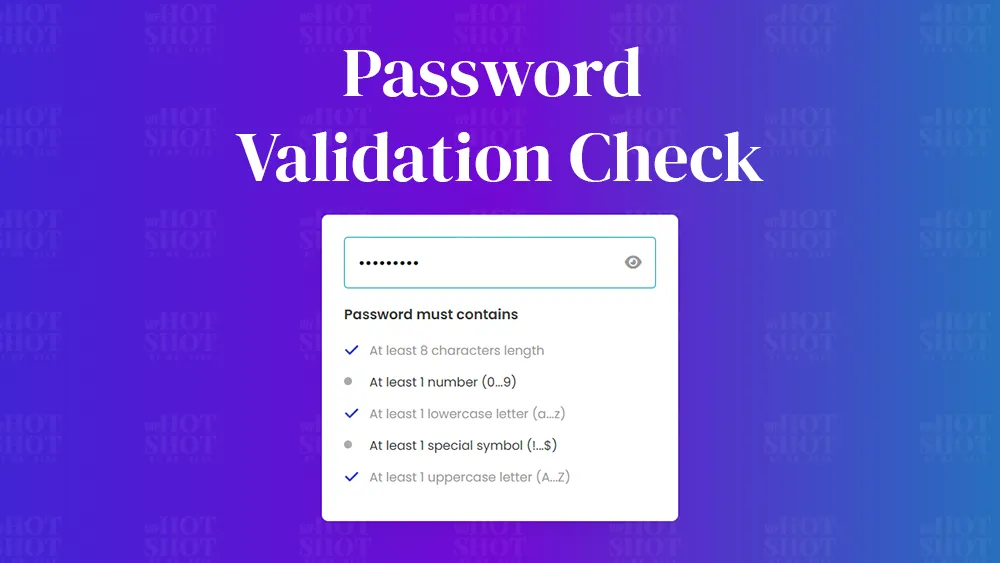
In today’s digital age, online security is more important than ever. One of the most basic but crucial measures to protect sensitive information is by implementing a strong password policy. However, not all users are aware of the importance of creating a strong password. As a web developer, it’s your responsibility to help them by implementing a password validation check on your website.
A password validation check is a feature that verifies if a password meets specific criteria before it can be accepted. In this article, we will guide you on how to create a password validation check using HTML, CSS, and JavaScript.
Step 1: Create the HTML Form
The first step is to create an HTML form that will allow users to enter their password. You can use the HTML input tag with the type attribute set to “password” to create the password field. Additionally, you can add labels and placeholders to provide clear instructions to the user.
					<!DOCTYPE html>
<!-- Created By Mr. Geek - www.wphotshot.com -->
<html lang="en" dir="ltr">

<head>
  <meta charset="utf-8">
  <title>Password Validation Check | WpHotShot</title>
  <link rel="stylesheet" href="style.css">
    <meta name="viewport" content="width=device-width, initial-scale=1.0">
    <!-- Fontawesome Link for Icons -->
    <link rel="stylesheet" href="https://cdnjs.cloudflare.com/ajax/libs/font-awesome/6.3.0/css/all.min.css">
    <script src="main.js" defer></script>
</head>

<body>
  <div class="wrapper">
    <div class="pass-field">
      <input type="password" placeholder="Create password">
      <i class="fa-solid fa-eye"></i>
    </div>
    <div class="content">
      <p>Password must contains</p>
      <ul class="requirement-list">
        <li>
          <i class="fa-solid fa-circle"></i>
          <span>At least 8 characters length</span>
        </li>
        <li>
          <i class="fa-solid fa-circle"></i>
          <span>At least 1 number (0...9)</span>
        </li>
        <li>
          <i class="fa-solid fa-circle"></i>
          <span>At least 1 lowercase letter (a...z)</span>
        </li>
        <li>
          <i class="fa-solid fa-circle"></i>
          <span>At least 1 special symbol (!...$)</span>
        </li>
        <li>
          <i class="fa-solid fa-circle"></i>
          <span>At least 1 uppercase letter (A...Z)</span>
        </li>
      </ul>
    </div>
  </div>
</body>

</html>
Step 2: Add CSS Styling
Next, you can add CSS styling to the form to make it visually appealing and user-friendly. You can customize the appearance of the password field, labels, and placeholders using CSS properties such as font-size, color, and background-color.
					/* Import Google font - Poppins */
@import url('https://fonts.googleapis.com/css2?family=Poppins:wght@400;500;600&display=swap');
* {
  margin: 0;
  padding: 0;
  box-sizing: border-box;
  font-family: "Poppins", sans-serif;
}
body {
  display: flex;
  align-items: center;
  justify-content: center;
  min-height: 100vh;
  background: linear-gradient(90deg, #2832d4, #7209d4, #00a5b2);
}
.wrapper {
  width: 450px;
  overflow: hidden;
  padding: 28px;
  border-radius: 8px;
  background: #fff;
  box-shadow: 0 10px 25px rgba(0,0,0,0.06);
}
.wrapper .pass-field {
  height: 65px;
  width: 100%;
  position: relative;
}
.pass-field input {
  width: 100%;
  height: 100%;
  outline: none;
  padding: 0 17px;
  font-size: 1.3rem;
  border-radius: 5px;
  border: 1px solid #00a5b2;
}
.pass-field input:focus {
  padding: 0 16px;
  border: 2px solid #2832d4;
}
.pass-field i {
  right: 18px;
  top: 50%;
  font-size: 1.2rem;
  color: #999;
  cursor: pointer;
  position: absolute;
  transform: translateY(-50%);
}
.wrapper .content {
  margin: 20px 0 10px;
}
.content p {
  color: #333;
  font-size: 1.1rem;
  font-weight: 700;
}
.content .requirement-list {
  margin-top: 20px;
}
.requirement-list li {
  font-size: 1rem;
  list-style: none;
  display: flex;
  align-items: center;
  margin-bottom: 15px;
}
.requirement-list li i {
  width: 20px;
  color: #aaa;
  font-size: 0.6rem;
}
.requirement-list li.valid i {
  font-size: 1.2rem;
  color: #2832d4;
}
.requirement-list li span {
  margin-left: 12px;
  color: #333;
}
.requirement-list li.valid span {
  color: #999;
}

@media screen and (max-width: 500px) {
  body, .wrapper {
    padding: 15px;
  }
  .wrapper .pass-field {
    height: 55px;
  }
  .pass-field input, .content p  {
    font-size: 1.15rem;
  }
  .pass-field i, .requirement-list li {
    font-size: 1.1rem;
  }
  .requirement-list li span {
    margin-left: 7px;
  }
}
Step 3: Implement JavaScript Validation
The most critical step in creating a password validation check is implementing JavaScript validation. You can create a JavaScript function that will check if the password meets specific requirements, such as minimum length, presence of uppercase and lowercase letters, and special characters.
To implement this, you can use regular expressions, which are patterns used to match character combinations in strings. You can also use JavaScript’s built-in methods, such as length, match, and test, to validate the password.
					const passwordInput = document.querySelector(".pass-field input");
const eyeIcon = document.querySelector(".pass-field i");
const requirementList = document.querySelectorAll(".requirement-list li");

// An array of password requirements with corresponding
// regular expressions and index of the requirement list item
const requirements = [
    { regex: /.{8,}/, index: 0 }, // Minimum of 8 characters
    { regex: /[0-9]/, index: 1 }, // At least one number
    { regex: /[a-z]/, index: 2 }, // At least one lowercase letter
    { regex: /[^A-Za-z0-9]/, index: 3 }, // At least one special character
    { regex: /[A-Z]/, index: 4 }, // At least one uppercase letter
]

passwordInput.addEventListener("keyup", (e) => {
    requirements.forEach(item => {
        // Check if the password matches the requirement regex
        const isValid = item.regex.test(e.target.value);
        const requirementItem = requirementList[item.index];

        // Updating class and icon of requirement item if requirement matched or not
        if (isValid) {
            requirementItem.classList.add("valid");
            requirementItem.firstElementChild.className = "fa-solid fa-check";
        } else {
            requirementItem.classList.remove("valid");
            requirementItem.firstElementChild.className = "fa-solid fa-circle";
        }
    });
});

eyeIcon.addEventListener("click", () => {
    // Toggle the password input type between "password" and "text"
    passwordInput.type = passwordInput.type === "password" ? "text" : "password";

    // Update the eye icon class based on the password input type
    eyeIcon.className = `fa-solid fa-eye${passwordInput.type === "password" ? "" : "-slash"}`;
});
Conclusion
In conclusion, implementing a password validation check is an essential step to improve the security of your web application. By following the steps above, you can create a password validation check using HTML, CSS, and JavaScript that will help users create strong passwords and prevent unauthorized access. Don’t forget to test your code thoroughly to ensure that it works as intended.

