Card hover effects are a popular web design technique that adds interactivity and enhances user engagement. When implemented correctly, they can elevate the visual appeal of a website and make it stand out. In this comprehensive guide, we will explore the art of creating card hover effects using HTML and CSS. Whether you are a beginner or an experienced web developer, this tutorial will equip you with the necessary skills to craft impressive card hover effects that captivate your audience. Let’s dive in!
Step 1: Understanding Card Hover Effects
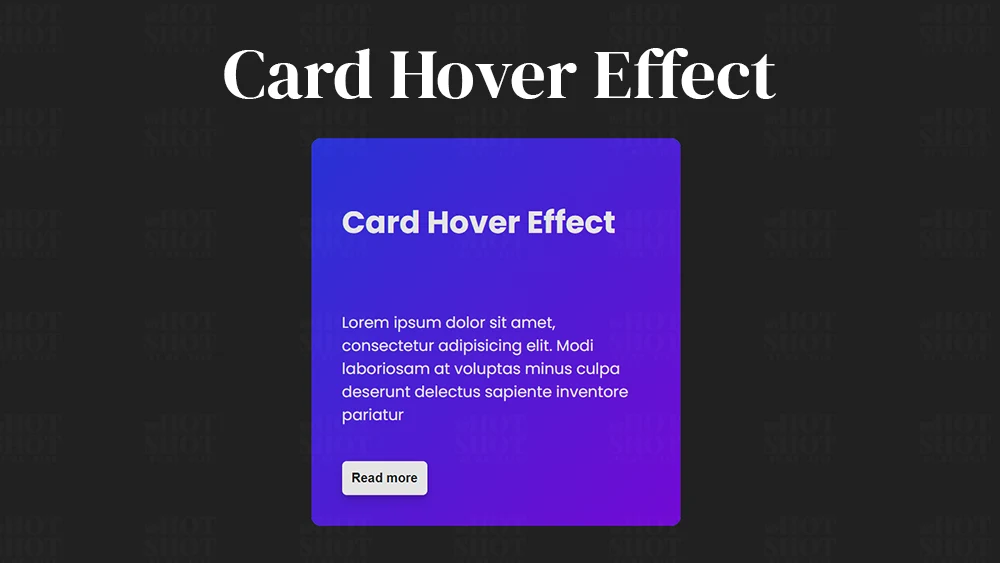
Card hover effects provide an interactive and engaging experience for website visitors, making them an essential element of modern user interfaces. These effects help to draw attention to specific content or actions, allowing users to interact with cards in a more intuitive and dynamic way. By triggering animations, transitions, or changes in visual appearance upon hovering over a card, users are encouraged to explore further, increasing engagement and improving the overall user experience.
Step 2: Implementing Card Hover Effects in HTML
Here, we will explore the step-by-step process of implementing card hover effects using HTML. We will cover the basic structure of a card, including the necessary HTML elements and attributes. Additionally, we will examine how to incorporate hover interactions by leveraging CSS selectors and pseudo-classes. Through detailed explanations and practical examples, you will gain a solid foundation in creating captivating card hover effects.
					<!DOCTYPE html>
<!-- By Mr. Geek - www.wphotshot.com -->
<html lang="en">

<head>
  <meta charset="UTF-8" />
  <meta http-equiv="X-UA-Compatible" content="IE=edge" />
  <meta name="viewport" content="width=device-width, initial-scale=1.0" />
  <title>Card Hover Effect | WPHotshot</title>
  <link rel="stylesheet" href="style.css" />
  <script src="main.js" defer></script>
  <!-- Fontawesome CDN Link -->
  <link rel="stylesheet" href="https://cdnjs.cloudflare.com/ajax/libs/font-awesome/6.2.1/css/all.min.css" />
</head>

<body>
  <div class="container">
    <div class="card">
      <div class="content">
        <p class="heading">Card Hover Effect
        </p><p class="para">
          Lorem ipsum dolor sit amet, consectetur adipisicing elit. Modi
          laboriosam at voluptas minus culpa deserunt delectus sapiente
          inventore pariatur
        </p>
        <button class="btn">Read more</button>
      </div>
    </div>
 </div>

</html>
Step 3: Enhancing Card Hover Effects with CSS
In this section, we will focus on enhancing the visual appeal and interactivity of card hover effects using CSS. You will learn how to apply transitions, animations, and transformations to create dynamic effects that engage users. We will also discuss techniques such as adding shadows, gradients, and overlays to further elevate the aesthetics of the cards. By the end of this section, you will have a comprehensive understanding of how CSS can breathe life into your card hover effects.
					/* Import Google font - Poppins */
@import url("https://fonts.googleapis.com/css2?family=Poppins:wght@200;300;400;500;600;700&display=swap");

@import url('https://fonts.googleapis.com/css2?family=DM+Serif+Display:ital@0;1&display=swap');

body {
  height: 100vh;
  display: flex;
  align-items: center;
  justify-content: center;
  background: #212121;
  font-family: "Poppins", sans-serif;
}

.container{
  background-color: #00A5B2;
  border-radius: 10px;
}

.card {
  position: relative;
  display: flex;
  align-items: center;
  justify-content: center;
  width: 320px;
  box-shadow: 0 10px 20px rgba(0, 0, 0, 0.2);
  padding: 32px;
  overflow: hidden;
  border-radius: 10px;
  transition: all 0.5s cubic-bezier(0.23, 1, 0.320, 1);
}

.content {
  display: flex;
  flex-direction: column;
  align-items: flex-start;
  gap: 20px;
  color: #e4e4e4;
  transition: all 0.5s cubic-bezier(0.23, 1, 0.320, 1);
  z-index: 2;
}

.content .heading {
  font-weight: 700;
  font-size: 32px;
}

.content .para {
  line-height: 1.5;
}

.content .btn {
  color: #e4e4e4;
  text-decoration: none;
  padding: 10px;
  font-weight: 600;
  border: none;
  cursor: pointer;
  background: #2832d4;
  border-radius: 5px;
  box-shadow: 0 5px 10px rgba(0, 0, 0, 0.2);
}

.card::before {
  content: "";
  position: absolute;
  left: 0;
  bottom: 0;
  width: 100%;
  height: 5px;
  background: linear-gradient(135deg, #2832d4, #7209D4 100% );
  z-index: 1;
  transition: all 0.5s cubic-bezier(0.23, 1, 0.320, 1);
}

.card:hover::before {
  height: 100%;
}

.card:hover {
  box-shadow: none;
}

.card:hover .btn {
  color: #212121;
  background: #e4e4e4;
}

.content .btn:hover {
  outline: 2px solid #e4e4e4;
  background: transparent;
  color: #e4e4e4;
}

.content .btn:active {
  box-shadow: none;
}
Conclusion
Card hover effects are a powerful tool in a web developer’s arsenal, enabling them to create visually stunning and engaging user experiences. By mastering the techniques outlined in this article, you can take your web design skills to the next level. Remember to experiment, iterate, and seek inspiration from other designers. Embrace the creative possibilities offered by card hover effects, and watch as your websites come alive with captivating interactions. Happy coding!

