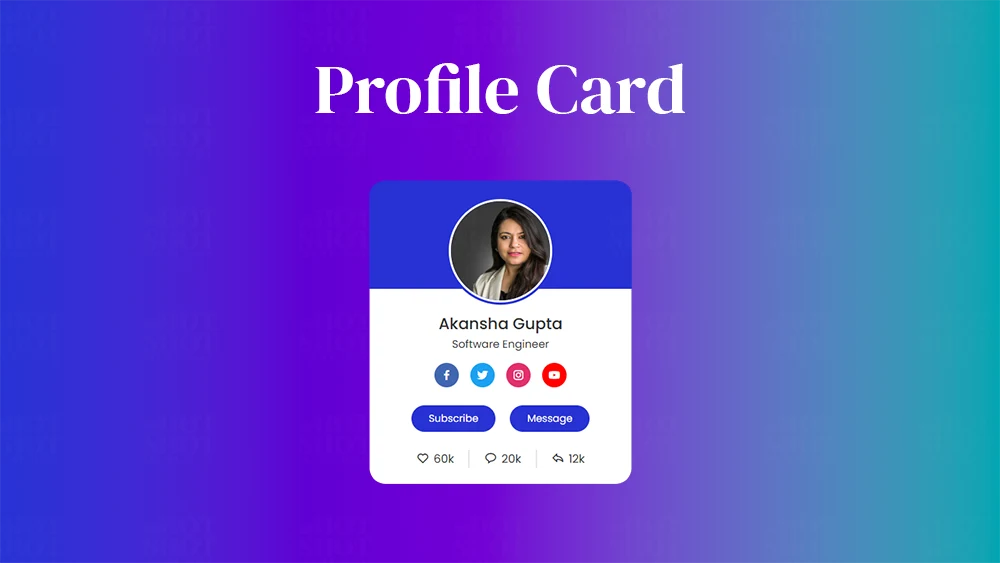
If you’re looking to create an eye-catching and informative profile card for your website, you’re in the right place. In this tutorial, we’ll walk you through the steps to create a profile card using HTML and CSS.
Step 1: Setting up the HTML File
To begin creating a profile card, we’ll need to create a new HTML file and add the basic structure. We’ll start by creating a div element with the class of “profile-card”. Inside the div element, we’ll add an image, name, job title and social media icons.
					<!DOCTYPE html>
<!-- Coding by WPHotShot | www.wphotshot.com-->
<html lang="en">
  <head>
    <meta charset="UTF-8" />
    <meta http-equiv="X-UA-Compatible" content="IE=edge" />
    <meta name="viewport" content="width=device-width, initial-scale=1.0" />
    <!--<title>Profile Card UI Design | WPHotShot</title>-->

    <!-- CSS -->
    <link rel="stylesheet" href="style.css" />

    <!-- Boxicons CSS -->
    <link
      href="https://unpkg.com/boxicons@2.1.2/css/boxicons.min.css"
      rel="stylesheet"
    />
  </head>
  <body>
    <div class="profile-card">
      <div class="image">
        <img decoding="async" src="img/pic1.jpg" alt="profile-image" class="profile-img" />
      </div>

      <div class="text-data">
        <span class="name">Akansha Gupta</span>
        <span class="job">Software Engineer</span>
      </div>

      <div class="media-buttons">
        <a href="#" style="background: #4267b2" class="link">
          <i class="bx bxl-facebook"></i>
        </a>
        <a href="#" style="background: #1da1f2" class="link">
          <i class="bx bxl-twitter"></i>
        </a>
        <a href="#" style="background: #e1306c" class="link">
          <i class="bx bxl-instagram"></i>
        </a>
        <a href="#" style="background: #ff0000" class="link">
          <i class="bx bxl-youtube"></i>
        </a>
      </div>

      <div class="buttons">
        <button class="button">Subscribe</button>
        <button class="button">Message</button>
      </div>

      <div class="analytics">
        <div class="data">
          <i class="bx bx-heart"></i>
          <span class="number">60k</span>
        </div>
        <div class="data">
          <i class="bx bx-message-rounded"></i>
          <span class="number">20k</span>
        </div>
        <div class="data">
          <i class="bx bx-share"></i>
          <span class="number">12k</span>
        </div>
      </div>
    </div>
  </body>
</html>
Step 2: Styling the Profile Card with CSS
Now that we have the HTML structure in place, we can add some CSS to style our profile card. We can set the width, background color, and box-shadow for the card, add some padding and text-align to center the content, and use a font for the text. We can also add styles for the profile image, name, and job title, including setting the width and height of the image, using border-radius to create a circular image, and setting the font size and color for the name and job title. Finally, we can add styles for the social icons, including setting the list-style to none, using display: inline-block to place the icons side by side, and setting the color and hover color for the icons.
					/* Google Fonts - Poppins */
@import url("https://fonts.googleapis.com/css2?family=Poppins:wght@300;400;500;600&display=swap");

* {
  margin: 0;
  padding: 0;
  box-sizing: border-box;
  font-family: "Poppins", sans-serif;
}
body {
  height: 100vh;
  display: flex;
  align-items: center;
  justify-content: center;
  background: linear-gradient(to right, #2832d4, #00A5B2, #7209D4);
}
.profile-card {
  display: flex;
  flex-direction: column;
  align-items: center;
  max-width: 370px;
  width: 100%;
  background: #fff;
  border-radius: 24px;
  padding: 25px;
  box-shadow: 0 5px 10px rgba(0, 0, 0, 0.1);
  position: relative;
}
.profile-card::before {
  content: "";
  position: absolute;
  top: 0;
  left: 0;
  height: 36%;
  width: 100%;
  border-radius: 24px 24px 0 0;
  background-color: #2832d4;
}
.image {
  position: relative;
  height: 150px;
  width: 150px;
  border-radius: 50%;
  background-color: #2832d4;
  padding: 3px;
  margin-bottom: 10px;
}
.image .profile-img {
  height: 100%;
  width: 100%;
  object-fit: cover;
  border-radius: 50%;
  border: 3px solid #fff;
}
.profile-card .text-data {
  display: flex;
  flex-direction: column;
  align-items: center;
  color: #333;
}
.text-data .name {
  font-size: 22px;
  font-weight: 500;
}
.text-data .job {
  font-size: 15px;
  font-weight: 400;
}
.profile-card .media-buttons {
  display: flex;
  align-items: center;
  margin-top: 15px;
}
.media-buttons .link {
  display: flex;
  align-items: center;
  justify-content: center;
  color: #fff;
  font-size: 18px;
  height: 34px;
  width: 34px;
  border-radius: 50%;
  margin: 0 8px;
  background-color: #2832d4;
  text-decoration: none;
}
.profile-card .buttons {
  display: flex;
  align-items: center;
  margin-top: 25px;
}
.buttons .button {
  color: #fff;
  font-size: 14px;
  font-weight: 400;
  border: none;
  border-radius: 24px;
  margin: 0 10px;
  padding: 8px 24px;
  background-color:  #2832d4;
  cursor: pointer;
  transition: all 0.3s ease;
}
.buttons .button:hover {
  background-color: #00a5b2;
}
.profile-card .analytics {
  display: flex;
  align-items: center;
  margin-top: 25px;
}
.analytics .data {
  display: flex;
  align-items: center;
  color: #333;
  padding: 0 20px;
  border-right: 2px solid #e7e7e7;
}
.data i {
  font-size: 18px;
  margin-right: 6px;
}
.data:last-child {
  border-right: none;
}
Conclusion
In conclusion, creating a profile card using HTML and CSS is a great way to showcase your skills and experience on your website. By following the steps outlined in this tutorial, you can create a professional-looking card that is both informative and visually appealing.

