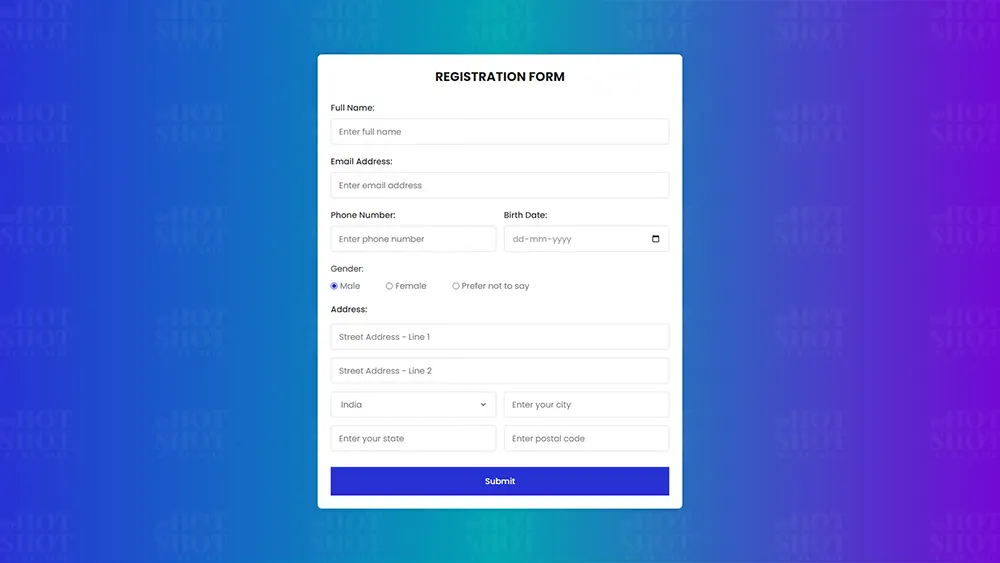
In this blog post, you’ll discover the process of crafting a Responsive Registration Form using HTML & CSS. Even if you’re a novice with only basic understanding of HTML and CSS, you’ll find it accessible to create this form.
A Registration Form serves as a crucial component of websites or applications, requiring users to input various details such as their name, email, address, and more.
Take a glimpse at the preview of the Registration Form you’ll be mastering through this blog. You’ll notice essential input fields essential for every Registration, along with radio buttons for selection and a submit button.
HTML:
HTML is used to create the structure and layout of the registration form. It allows web developers to define the various elements of the form, such as input fields, labels, buttons, and dropdown lists. HTML provides the basic building blocks for creating interactive web forms that users can fill out and submit. Let’s break down the structure:
Container Section: The
<section>tag with the class “container” is used to create a section for the registration form. This helps in organizing and styling the form elements.Header: The
<header>tag is used to define the heading of the registration form, which is “REGISTRATION FORM” in this case.Form: The
<form>tag is used to create a form that collects user input. It has an action attribute set to “reg.php”, which specifies the URL where the form data will be submitted for processing. The method attribute is set to “POST”, indicating that form data will be sent to the server using the HTTP POST method.Input Fields: Various
<input>tags are used to create input fields for collecting information such as full name, email address, phone number, birth date, address, city, region, and postal code. Each input field has attributes like type (text, number, date), name (to identify the input field when the form is submitted), placeholder (a hint to the user about what to enter), and required (to make the input field mandatory).Radio Buttons: The
<input>tags with type “radio” are used to create radio buttons for selecting the gender. They are grouped together using the same name attribute, allowing the user to select only one option.Select Box: The
<select>tag is used to create a dropdown list for selecting the country. It contains multiple<option>tags, each representing a country. Users can select one country from the list.Submit Button: The
<button>tag is used to create a submit button. When clicked, it submits the form data to the server for processing.
Here, I have created a file name index.html for this code. But you can name this file anything you want.
					<!DOCTYPE html>
<!---Coding By Mr.Geek | www.wphotshot.com--->
<html lang="en">

<head>
  <meta charset="UTF-8" />
  <meta name="viewport" content="width=device-width, initial-scale=1.0" />
  <meta http-equiv="X-UA-Compatible" content="ie=edge" />
  <title>WPHotShot | Registration Form in HTML & CSS</title>
  <!---Custom CSS File--->
  <link rel="stylesheet" href="style.css" />
</head>

<body>
  <section class="container">
    <header>REGISTRATION FORM</header>
    <form action="reg.php" method="POST" class="form">
      <div class="input-box">
        <label>Full Name:</label>
        <input type="text" name="full_name" placeholder="Enter full name" required />
      </div>

      <div class="input-box">
        <label>Email Address:</label>
        <input type="text" name="email" placeholder="Enter email address" required />
      </div>

      <div class="column">
        <div class="input-box">
          <label>Phone Number:</label>
          <input type="number" name="phone_number" placeholder="Enter phone number" required />
        </div>
        <div class="input-box">
          <label>Birth Date:</label>
          <input type="date" name="birth_date" placeholder="Enter birth date" required />
        </div>
      </div>
      <div class="gender-box">
        <h3>Gender:</h3>
        <div class="gender-option">
          <div class="gender">
            <input type="radio" id="check-male" name="gender" checked />
            <label for="check-male">Male</label>
          </div>
          <div class="gender">
            <input type="radio" id="check-female" name="gender" />
            <label for="check-female">Female</label>
          </div>
          <div class="gender">
            <input type="radio" id="check-other" name="gender" />
            <label for="check-other">Prefer not to say</label>
          </div>
        </div>
      </div>
      <div class="input-box address">
        <label>Address:</label>
        <input type="text" name="street_address1" placeholder="Street Address - Line 1" required />
        <input type="text" name="street_address1" placeholder="Street Address - Line 2" required />
        <div class="column">
          <div class="select-box">
            <select name="country">
              <option value="India">India</option>
              <option value="Afghanistan">Afghanistan</option>
              <option value="Åland Islands">Åland Islands</option>
              <option value="Albania">Albania</option>
              <option value="Algeria">Algeria</option>
              <option value="American Samoa">American Samoa</option>
              <option value="Andorra">Andorra</option>
              <option value="Angola">Angola</option>
              <option value="Anguilla">Anguilla</option>
              <option value="Antarctica">Antarctica</option>
              <option value="Antigua and Barbuda">Antigua and Barbuda</option>
              <option value="Argentina">Argentina</option>
              <option value="Armenia">Armenia</option>
              <option value="Aruba">Aruba</option>
              <option value="Australia">Australia</option>
              <option value="Austria">Austria</option>
              <option value="Azerbaijan">Azerbaijan</option>
              <option value="Bahamas">Bahamas</option>
              <option value="Bahrain">Bahrain</option>
              <option value="Bangladesh">Bangladesh</option>
              <option value="Barbados">Barbados</option>
              <option value="Belarus">Belarus</option>
              <option value="Belgium">Belgium</option>
              <option value="Belize">Belize</option>
              <option value="Benin">Benin</option>
              <option value="Bermuda">Bermuda</option>
              <option value="Bhutan">Bhutan</option>
              <option value="Bolivia">Bolivia</option>
              <option value="Bosnia and Herzegovina">Bosnia and Herzegovina</option>
              <option value="Botswana">Botswana</option>
              <option value="Bouvet Island">Bouvet Island</option>
              <option value="Brazil">Brazil</option>
              <option value="British Indian Ocean Territory">British Indian Ocean Territory</option>
              <option value="Brunei Darussalam">Brunei Darussalam</option>
              <option value="Bulgaria">Bulgaria</option>
              <option value="Burkina Faso">Burkina Faso</option>
              <option value="Burundi">Burundi</option>
              <option value="Cambodia">Cambodia</option>
              <option value="Cameroon">Cameroon</option>
              <option value="Canada">Canada</option>
              <option value="Cape Verde">Cape Verde</option>
              <option value="Cayman Islands">Cayman Islands</option>
              <option value="Central African Republic">Central African Republic</option>
              <option value="Chad">Chad</option>
              <option value="Chile">Chile</option>
              <option value="China">China</option>
              <option value="Christmas Island">Christmas Island</option>
              <option value="Cocos (Keeling) Islands">Cocos (Keeling) Islands</option>
              <option value="Colombia">Colombia</option>
              <option value="Comoros">Comoros</option>
              <option value="Congo">Congo</option>
              <option value="Congo, The Democratic Republic of The">Congo, The Democratic Republic of The</option>
              <option value="Cook Islands">Cook Islands</option>
              <option value="Costa Rica">Costa Rica</option>
              <option value="Cote D'ivoire">Cote D'ivoire</option>
              <option value="Croatia">Croatia</option>
              <option value="Cuba">Cuba</option>
              <option value="Cyprus">Cyprus</option>
              <option value="Czech Republic">Czech Republic</option>
              <option value="Denmark">Denmark</option>
              <option value="Djibouti">Djibouti</option>
              <option value="Dominica">Dominica</option>
              <option value="Dominican Republic">Dominican Republic</option>
              <option value="Ecuador">Ecuador</option>
              <option value="Egypt">Egypt</option>
              <option value="El Salvador">El Salvador</option>
              <option value="Equatorial Guinea">Equatorial Guinea</option>
              <option value="Eritrea">Eritrea</option>
              <option value="Estonia">Estonia</option>
              <option value="Ethiopia">Ethiopia</option>
              <option value="Falkland Islands (Malvinas)">Falkland Islands (Malvinas)</option>
              <option value="Faroe Islands">Faroe Islands</option>
              <option value="Fiji">Fiji</option>
              <option value="Finland">Finland</option>
              <option value="France">France</option>
              <option value="French Guiana">French Guiana</option>
              <option value="French Polynesia">French Polynesia</option>
              <option value="French Southern Territories">French Southern Territories</option>
              <option value="Gabon">Gabon</option>
              <option value="Gambia">Gambia</option>
              <option value="Georgia">Georgia</option>
              <option value="Germany">Germany</option>
              <option value="Ghana">Ghana</option>
              <option value="Gibraltar">Gibraltar</option>
              <option value="Greece">Greece</option>
              <option value="Greenland">Greenland</option>
              <option value="Grenada">Grenada</option>
              <option value="Guadeloupe">Guadeloupe</option>
              <option value="Guam">Guam</option>
              <option value="Guatemala">Guatemala</option>
              <option value="Guernsey">Guernsey</option>
              <option value="Guinea">Guinea</option>
              <option value="Guinea-bissau">Guinea-bissau</option>
              <option value="Guyana">Guyana</option>
              <option value="Haiti">Haiti</option>
              <option value="Heard Island and Mcdonald Islands">Heard Island and Mcdonald Islands</option>
              <option value="Holy See (Vatican City State)">Holy See (Vatican City State)</option>
              <option value="Honduras">Honduras</option>
              <option value="Hong Kong">Hong Kong</option>
              <option value="Hungary">Hungary</option>
              <option value="Iceland">Iceland</option>
              <option value="Indonesia">Indonesia</option>
              <option value="Iran, Islamic Republic of">Iran, Islamic Republic of</option>
              <option value="Iraq">Iraq</option>
              <option value="Ireland">Ireland</option>
              <option value="Isle of Man">Isle of Man</option>
              <option value="Israel">Israel</option>
              <option value="Italy">Italy</option>
              <option value="Jamaica">Jamaica</option>
              <option value="Japan">Japan</option>
              <option value="Jersey">Jersey</option>
              <option value="Jordan">Jordan</option>
              <option value="Kazakhstan">Kazakhstan</option>
              <option value="Kenya">Kenya</option>
              <option value="Kiribati">Kiribati</option>
              <option value="Korea, Democratic People's Republic of">Korea, Democratic People's Republic of</option>
              <option value="Korea, Republic of">Korea, Republic of</option>
              <option value="Kuwait">Kuwait</option>
              <option value="Kyrgyzstan">Kyrgyzstan</option>
              <option value="Lao People's Democratic Republic">Lao People's Democratic Republic</option>
              <option value="Latvia">Latvia</option>
              <option value="Lebanon">Lebanon</option>
              <option value="Lesotho">Lesotho</option>
              <option value="Liberia">Liberia</option>
              <option value="Libyan Arab Jamahiriya">Libyan Arab Jamahiriya</option>
              <option value="Liechtenstein">Liechtenstein</option>
              <option value="Lithuania">Lithuania</option>
              <option value="Luxembourg">Luxembourg</option>
              <option value="Macao">Macao</option>
              <option value="Macedonia, The Former Yugoslav Republic of">Macedonia, The Former Yugoslav Republic of</option>
              <option value="Madagascar">Madagascar</option>
              <option value="Malawi">Malawi</option>
              <option value="Malaysia">Malaysia</option>
              <option value="Maldives">Maldives</option>
              <option value="Mali">Mali</option>
              <option value="Malta">Malta</option>
              <option value="Marshall Islands">Marshall Islands</option>
              <option value="Martinique">Martinique</option>
              <option value="Mauritania">Mauritania</option>
              <option value="Mauritius">Mauritius</option>
              <option value="Mayotte">Mayotte</option>
              <option value="Mexico">Mexico</option>
              <option value="Micronesia, Federated States of">Micronesia, Federated States of</option>
              <option value="Moldova, Republic of">Moldova, Republic of</option>
              <option value="Monaco">Monaco</option>
              <option value="Mongolia">Mongolia</option>
              <option value="Montenegro">Montenegro</option>
              <option value="Montserrat">Montserrat</option>
              <option value="Morocco">Morocco</option>
              <option value="Mozambique">Mozambique</option>
              <option value="Myanmar">Myanmar</option>
              <option value="Namibia">Namibia</option>
              <option value="Nauru">Nauru</option>
              <option value="Nepal">Nepal</option>
              <option value="Netherlands">Netherlands</option>
              <option value="Netherlands Antilles">Netherlands Antilles</option>
              <option value="New Caledonia">New Caledonia</option>
              <option value="New Zealand">New Zealand</option>
              <option value="Nicaragua">Nicaragua</option>
              <option value="Niger">Niger</option>
              <option value="Nigeria">Nigeria</option>
              <option value="Niue">Niue</option>
              <option value="Norfolk Island">Norfolk Island</option>
              <option value="Northern Mariana Islands">Northern Mariana Islands</option>
              <option value="Norway">Norway</option>
              <option value="Oman">Oman</option>
              <option value="Pakistan">Pakistan</option>
              <option value="Palau">Palau</option>
              <option value="Palestinian Territory, Occupied">Palestinian Territory, Occupied</option>
              <option value="Panama">Panama</option>
              <option value="Papua New Guinea">Papua New Guinea</option>
              <option value="Paraguay">Paraguay</option>
              <option value="Peru">Peru</option>
              <option value="Philippines">Philippines</option>
              <option value="Pitcairn">Pitcairn</option>
              <option value="Poland">Poland</option>
              <option value="Portugal">Portugal</option>
              <option value="Puerto Rico">Puerto Rico</option>
              <option value="Qatar">Qatar</option>
              <option value="Reunion">Reunion</option>
              <option value="Romania">Romania</option>
              <option value="Russian Federation">Russian Federation</option>
              <option value="Rwanda">Rwanda</option>
              <option value="Saint Helena">Saint Helena</option>
              <option value="Saint Kitts and Nevis">Saint Kitts and Nevis</option>
              <option value="Saint Lucia">Saint Lucia</option>
              <option value="Saint Pierre and Miquelon">Saint Pierre and Miquelon</option>
              <option value="Saint Vincent and The Grenadines">Saint Vincent and The Grenadines</option>
              <option value="Samoa">Samoa</option>
              <option value="San Marino">San Marino</option>
              <option value="Sao Tome and Principe">Sao Tome and Principe</option>
              <option value="Saudi Arabia">Saudi Arabia</option>
              <option value="Senegal">Senegal</option>
              <option value="Serbia">Serbia</option>
              <option value="Seychelles">Seychelles</option>
              <option value="Sierra Leone">Sierra Leone</option>
              <option value="Singapore">Singapore</option>
              <option value="Slovakia">Slovakia</option>
              <option value="Slovenia">Slovenia</option>
              <option value="Solomon Islands">Solomon Islands</option>
              <option value="Somalia">Somalia</option>
              <option value="South Africa">South Africa</option>
              <option value="South Georgia and The South Sandwich Islands">South Georgia and The South Sandwich Islands</option>
              <option value="Spain">Spain</option>
              <option value="Sri Lanka">Sri Lanka</option>
              <option value="Sudan">Sudan</option>
              <option value="Suriname">Suriname</option>
              <option value="Svalbard and Jan Mayen">Svalbard and Jan Mayen</option>
              <option value="Swaziland">Swaziland</option>
              <option value="Sweden">Sweden</option>
              <option value="Switzerland">Switzerland</option>
              <option value="Syrian Arab Republic">Syrian Arab Republic</option>
              <option value="Taiwan">Taiwan</option>
              <option value="Tajikistan">Tajikistan</option>
              <option value="Tanzania, United Republic of">Tanzania, United Republic of</option>
              <option value="Thailand">Thailand</option>
              <option value="Timor-leste">Timor-leste</option>
              <option value="Togo">Togo</option>
              <option value="Tokelau">Tokelau</option>
              <option value="Tonga">Tonga</option>
              <option value="Trinidad and Tobago">Trinidad and Tobago</option>
              <option value="Tunisia">Tunisia</option>
              <option value="Turkey">Turkey</option>
              <option value="Turkmenistan">Turkmenistan</option>
              <option value="Turks and Caicos Islands">Turks and Caicos Islands</option>
              <option value="Tuvalu">Tuvalu</option>
              <option value="Uganda">Uganda</option>
              <option value="Ukraine">Ukraine</option>
              <option value="United Arab Emirates">United Arab Emirates</option>
              <option value="United Kingdom">United Kingdom</option>
              <option value="United States">United States</option>
              <option value="United States Minor Outlying Islands">United States Minor Outlying Islands</option>
              <option value="Uruguay">Uruguay</option>
              <option value="Uzbekistan">Uzbekistan</option>
              <option value="Vanuatu">Vanuatu</option>
              <option value="Venezuela">Venezuela</option>
              <option value="Viet Nam">Viet Nam</option>
              <option value="Virgin Islands, British">Virgin Islands, British</option>
              <option value="Virgin Islands, U.S.">Virgin Islands, U.S.</option>
              <option value="Wallis and Futuna">Wallis and Futuna</option>
              <option value="Western Sahara">Western Sahara</option>
              <option value="Yemen">Yemen</option>
              <option value="Zambia">Zambia</option>
              <option value="Zimbabwe">Zimbabwe</option>
            </select>
          </div>
          <input type="text" name="city" placeholder="Enter your city" required />
        </div>
        <div class="column">
          <input type="text" name="region" placeholder="Enter your region" required />
          <input type="number" name="postal_code" placeholder="Enter postal code" required />
        </div>
      </div>
      <button>Submit</button>
    </form>
  </section>
</body>

</html>
CSS:
The provided CSS code begins with an import statement fetching the Google font “Poppins” in various weights for styling text throughout the document. The universal selector (*) is then used to reset margins, paddings, and box-sizing for all elements and to set the default font family to “Poppins”.
The body is styled to ensure a minimum height of the viewport and centered alignment of its content with a gradient background. The “.container” class defines styling for a central container element holding the form, featuring padding, background color, border radius, and a box shadow for a card-like appearance.
Various selectors within “.container” handle the styling of the form’s header, input fields, columns, gender selection, and address section. Finally, media queries are employed to ensure responsive design, adjusting layout and spacing for screens narrower than 500 pixels. Additionally, a hover effect is applied to the submit button for enhanced interactivity.
Here, I have created a file name style.css for this code as you can see in the HTML code. But you can name this file anything you want.
(If you are changing the file name, make sure to change it in the index.html file as well.)
					/* Import Google font - Poppins */
@import url("https://fonts.googleapis.com/css2?family=Poppins:wght@200;300;400;500;600;700&display=swap");

* {
  margin: 0;
  padding: 0;
  box-sizing: border-box;
  font-family: "Poppins", sans-serif;
}

body {
  min-height: 100vh;
  display: flex;
  align-items: center;
  justify-content: center;
  padding: 20px;
  background: linear-gradient(to right, #2832d4, #00A5B2, #7209D4);
}

.container {
  position: relative;
  max-width: 700px;
  width: 100%;
  background: #fff;
  padding: 25px;
  border-radius: 8px;
  box-shadow: 0 0 15px rgba(0, 0, 0, 0.1);
}

.container header {
  font-size: 1.5rem;
  color: #212121;
  font-weight: 700;
  text-align: center;
}

.container .form {
  margin-top: 30px;
}

.form .input-box {
  width: 100%;
  margin-top: 20px;
}

.input-box label {
  color: #212121;
  font-weight: 500;
}

.form :where(.input-box input, .select-box) {
  position: relative;
  height: 50px;
  width: 100%;
  outline: none;
  font-size: 1rem;
  color: #919191;
  margin-top: 8px;
  border: 1px solid #ddd;
  border-radius: 6px;
  padding: 0 15px;
}

.input-box input:focus {
  box-shadow: 0 1px 0 rgba(0, 0, 0, 0.1);
}

.form .column {
  display: flex;
  column-gap: 15px;
}

.form .gender-box {
  margin-top: 20px;
}

.gender-box h3 {
  color: #212121;
  font-size: 1rem;
  font-weight: 400;
  margin-bottom: 8px;
}

.form :where(.gender-option, .gender) {
  display: flex;
  align-items: center;
  column-gap: 50px;
  flex-wrap: wrap;
}

.form .gender {
  column-gap: 5px;
}

.gender input {
  accent-color: #2832d4;
}

.form :where(.gender input, .gender label) {
  cursor: pointer;
}

.gender label {
  color: #707070;
}

.address :where(input, .select-box) {
  margin-top: 15px;
}

.select-box select {
  height: 100%;
  width: 100%;
  outline: none;
  border: none;
  color: #707070;
  font-size: 1rem;
}

.form button {
  height: 55px;
  width: 100%;
  color: #fff;
  font-size: 1rem;
  font-weight: 500;
  margin-top: 30px;
  border: none;
  cursor: pointer;
  transition: all 0.2s ease;
  background: #2832d4;
}

.form button:hover {
  background: #00A5B2;
}

/*Responsive*/
@media screen and (max-width: 500px) {
  .form .column {
    flex-wrap: wrap;
  }

  .form :where(.gender-option, .gender) {
    row-gap: 15px;
  }
}
Overall, this CSS code provides a visually appealing and responsive layout for the registration form, ensuring a consistent user experience across different devices and screen sizes.
PHP:
The provided PHP code establishes a connection to a MySQL database and handles the backend processing of a registration form. It begins by defining the database connection details and creating a connection object using the mysqli class. Following this, it checks if the form has been submitted via the POST method. Upon form submission, the code prepares an SQL INSERT statement to add the user’s input data into the “users” table of the specified database.
To prevent SQL injection attacks, user inputs are sanitized using real_escape_string() and validated using filter_var() where necessary, such as for email validation. Once the SQL statement is prepared and the parameters are bound, the code executes the statement. If the execution is successful, it echoes a message indicating that a new record has been created. In case of any errors during execution, it displays an error message. Finally, the code closes the prepared statement and the database connection.
(If you are changing the file name, make sure to change it in the index.html file as well.)
Overall, this PHP script facilitates the secure handling and processing of user input data from a registration form, ensuring that the data is properly sanitized, validated, and stored in the database for further use.
					<?php
// Database connection details
$servername = "localhost"; // Change this if your database is hosted elsewhere
$username = "database username"; // Change this to your database username
$password = "database password"; // Change this to your database password
$dbname = "database name"; // Change this to your database name

// Create connection
$conn = new mysqli($servername, $username, $password, $dbname);

// Check connection
if ($conn->connect_error) {
    die("Connection failed: " . $conn->connect_error);
}

// Check if form is submitted
if ($_SERVER["REQUEST_METHOD"] == "POST") {
    // Prepare and bind SQL statement
    $stmt = $conn->prepare("INSERT INTO users (full_name, email, phone_number, birth_date, gender, street_address1, street_address2, country, city, region, postal_code) VALUES (?, ?, ?, ?, ?, ?, ?, ?, ?, ?, ?)");
    $stmt->bind_param("ssssssssssi", $full_name, $email, $phone_number, $birth_date, $gender, $street_address1, $street_address2, $country, $city, $region, $postal_code);

    // Escape and validate user inputs
    $full_name = htmlspecialchars($conn->real_escape_string($_POST['full_name']));
    $email = filter_var($conn->real_escape_string($_POST['email']), FILTER_VALIDATE_EMAIL);
    $phone_number = $conn->real_escape_string($_POST['phone_number']);
    $birth_date = $conn->real_escape_string($_POST['birth_date']);
    $gender = $conn->real_escape_string($_POST['gender']);
    $street_address1 = htmlspecialchars($conn->real_escape_string($_POST['street_address1']));
    $street_address2 = htmlspecialchars($conn->real_escape_string($_POST['street_address2']));
    $country = $conn->real_escape_string($_POST['country']);
    $city = htmlspecialchars($conn->real_escape_string($_POST['city']));
    $region = htmlspecialchars($conn->real_escape_string($_POST['region']));
    $postal_code = $conn->real_escape_string($_POST['postal_code']);

    // Execute SQL statement
    if ($stmt->execute()) {
        echo "New record created successfully";
    } else {
        echo "Error: " . $stmt->error;
    }

    // Close statement
    $stmt->close();
}

// Close connection
$conn->close();
?>
Conclusion:
In conclusion, the collective article provides comprehensive insights into creating a responsive registration form, incorporating HTML, CSS, and PHP. Through a step-by-step breakdown, it elucidates the importance of each component in facilitating a seamless user experience. HTML establishes the structural foundation, CSS adds stylistic elements for enhanced visual appeal and responsiveness, while PHP ensures the form’s functionality and data handling on the server-side. By leveraging modern techniques such as flexbox, media queries, and Google Fonts integration, the article equips developers with the tools to craft registration forms that adapt fluidly across various devices and screen sizes. With a clear understanding of the code snippets and their application, readers are empowered to implement responsive design principles effectively in their web development projects.


One Response
Great tutorial, thanks.